


The wall is constructed using exactly the same techniques used in making the gun battery, albeit much simpler as there is next to no cutting and NO angles. To break up the monotony of a plain wall I decided to insert a wooden pylon mid way. This led to the idea of hanging a gibbet from the pylon, as a "welcoming" to any newcomers to the port. A short tutorial follows of how I made the gibbet and it's post.
 |
| Port wall & gibbet |
 |
| Cut out a section of "Granny Grating" (if you can wrestle it from your Nan) |
 |
| Find an appropriately sized cylinder and bind the grating with strands of copper wire. Carefully fix with super glue. |
 |
| When dry remove it from the cylinder and cut out some of the sections of grating to make larger openings |
 |
| Cut out two round sections of grating to fit in each end. Carefully fix with super glue |
 |
| Make a loop of wire to hang the gibbet and fix with super glue |
 |
| Spray the gibbet by holding onto the copper wire strands, then clip them off. |
 |
| The post is made from different sized craft sticks, some toothpicks and wire. Drilling small holes to accommodate the different sized sticks is recommended |
 |
| Painted and put in place, with some crochet thread as rope attached |
 |
| Without the hanging gibbet the post could be a hoist or other port-side thingy |
 |
| The completed piece, with a rusty gibbet |
 |
| The two existing pieces married together |
 |
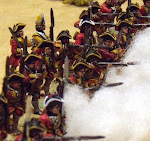
| A picture of the battery and wall in place - some more port walls to go |

It seems so simple, effective...and excellent!
ReplyDeleteNice work, very simple and effective
ReplyDeletevery effective gibbet and so simple!
ReplyDeleteWonderful looking additions.
ReplyDeleteCheers
Stu
That is absolutely superb!
ReplyDeleteThanks for all the encouraging comments gents
ReplyDeleteExcellent scratch-built work! When I first saw the gibbet I thought it was a commercial piece.
ReplyDeleteVery impressive work and modeling. I wonder if a hot glue gun with or without the glue could be used to bind the cylinder together?
ReplyDeleteJim
Suitably grim - will it have a tenant any time soon?
ReplyDelete@ Fitz-Badger thank you Sir, you are too kind!
ReplyDelete@ Der Alte Fritz - I think you would still have to bind the grating, but hot glue could work
@ Conrad Kinch - I'd love to find a suitable figure, other than that some bones and detritus
Great modeling, sir!
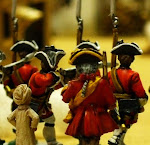
ReplyDeleteLovely work there! For a suitable mini to stick in the gibbet, I immediately thought of the guy on the right in this pack: http://www.redoubtenterprises.com/shop/?page=shop/flypage&product_id=1010&category_id=a9060e20f5a1b1968ab1809394d4494f
ReplyDeleteThe rest should be fairly useful too.
@Mikko - good call mate - thanks for that
ReplyDeleteSuperb!
ReplyDelete