Welcome to "Adventures in Lead", a blog dedicated to the hobby of miniature wargaming. The figures and terrain on this site are mainly for a campaign set in exotic "Indostan", a distant land bearing remarkable similarities to 18th century India during the Seven Years War. Bits and pieces from other projects may pop up here as well from time to time, including colonials, gladiators, pirates, dinosaur-hunting and even some RPG'ing.
The actual campaign journal and after action reports for the Indostan campaign can be found on their own blog - "Indostan: The Jewel in the Crown", the link to which is found by clicking the small image below-left.
If you do find anything remotely interesting on this blog please leave a comment, it's what keeps these sites going and their authors motivated - Thanks for looking.

Wednesday, July 16, 2014

More New Stuff for Indostan

Here are a couple more things for our Indostan game this weekend.

First up is a scratchbuilt palanquin. This thing has bothered me for quite some time, about 4 years actually, and I have already had a shot at building one here, but never completed it, due to its clumsy look. I finally bit the bullet and forgot about being able to fit an actual miniature inside and went with a fully enclosed model instead.
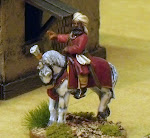
"Sorry gentlemen, I must leave you. My ride is here."
The palanquin is made simply from a foamboard base with thin cardboard sheeting. The supporting "pipe" is made from an ear bud tube, that goes directly through the whole piece. I was able to get the slightly curved roof shape (although it is a little hard to see it) by packing a few extra strips of card down the center of the roof.
The new improved Palanquin 2000
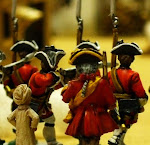
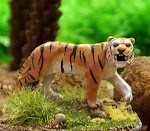
Whenever I set about to build anything my plan usually demands the piece to be versatile, hence I have made the bearers removable. This has two benefits. Firstly the palanquin can also represent a "parked" vehicle and secondly the bearers can be utilised for other projects (I see them carrying a tiger fresh from the hunt between them one day). The bearers, by the way, are Foundry Indian Mutiny figures. The poles are simply toothpicks that have their pointy bits inserted into the palanquin "pipe".


The second piece is a Front Rank ammunition cart. This is a nice model I scored years ago (a pair actually) from a car-boot sale, but like a lot of things has sat unpainted in a box. I'm a big fan of Front Rank and their vehicles are no exception. The cart comes with both a wicker and wooden cover, and includes traces for hitching the draft animals. BIG yoked horses were included in the buy, but of course for Indostan, one must simply demand oxen. They should probably have been painted for use by either the British or the French, in blue or red, respectively, but you know how versatile I like to be.
The wicker...
the wooden...
...and the oxen

Monday, July 14, 2014

New Stuff for Indostan

In preparation for an Indostan game this weekend (hopefully if all goes as planned) I have completed quite a few new units and individual figures. I have found it a great motivator to paint certain miniatures required for an impending game.
I plan on writing a short interlude using some of the following images to detail what has happened to our hero Keen and the current state of Indostan. For now they will show off what I've managed to complete.
A group shot of some of the new stuff
It was always planned that Keen would lead some native troops before getting a European command. We have had these Indus Miniatures "Peons" for quite some time now and they have sat in different stages of completeness. At first I thought the figures were a little too thin and wiry compared to my Foundry stuff, but when completed as an entire unit they are fine. The marching Peons have a few head changes to break the monotony of the same pose. They will serve proudly as sepoys of our "Madapras Native Regiment".
Indus Miniatures marching Peons
Indus Miniatures firing Peons
I also made two banners for the forces of the Honorable East Indostan Company. One may well be appropriate, featuring a banner I read was used by the East India Company, and consists of the "Grand Union Flag", but I'm not 100% sure. The other is purely fictitious and is actually taken from a coat of arms for the Pirates of the Caribbean movies and their villainous version of the EIC. Regardless I like them and they will add some grandeur to the British.
The new banners of the HEIC
 And lastly what would Indostan, or this blog for that matter, be without some goats. These fine specimens are from Magister Militum and are a bit closer to what I think an Indian goat would look like, well at least before being made into a vindaloo. They were quick and easy to do and I painted them a traditional black and white. Here are our other goats.
More goats...

Thursday, July 3, 2014

The Werewolf and the Highwayman.

Continuing on my 18th century horror stint, I present this pair.
I have had the Reaper Werewolf kicking around on the painting queue since last year. It is actually a Reaper Bones miniature, the first I have painted and I must say, I had no problems at all with it. Looking on the net I have seen it painted in brown, grey and even white, but I went for a more sinister, darker tone. It towers over a 28mm miniature and certainly will make an imposing monstrous villain.
The figure is an Outpost Wargame "Highwayman in French Greatcoat". I really like this miniaturre and he could just as easily serve as a hero or villain. He has a certain "Brotherhood of the Wolf" look, what with the greatcoat and all. Outpost are a decent match for Front Rank miniatures, if not a little chunky. I do hope he has silver bullets in those pistols though.


Tuesday, July 1, 2014

Houses for 18th century horror

Continuing slowly with my plans to do some 18th century horror games, I've nearly completed a selection of timber framed scratchbuilt houses. They are not quite finished and require the addition of chimneys and a coat of paint on their roofs, although looking at them, I don't mind the dark slate look.
The buildings are made from a foam-core base with coffee stirrer framing and cardboard shingles. The window frames are cut mdf from Warbases laid over a square of plastic, to give the illusion of glass. All in all fairly simple builds, but effective enough to represent what I want.
I am particularly proud of emulating (read, blatantly copying) the amazing tutorial of Captain Richard which he posted by request on his blog. My attempts are shown in the 3rd, 4th and 5th images below, and consist of using brick textures printed onto paper and card, which are applied directly to the walls of the buildings. My efforts pale in comparison to Capt. Richards' own projects, but his method has opened up a whole new way of doing things.
I have made 8 of these in total, including a large "gate building", but will require quite a few more for an entire village.